
If you’re promoting your business on Facebook or Instagram, but still not using Facebook Pixel, you’re losing your money. Why is that? Because Pixel helps you track user behavior, optimize ads, and bring back customers who didn’t make a purchase.
This is not magic, but an advanced analytical tool built into Meta’s advertising system. And it’s free.
What is Facebook Pixel and how does it work?
Facebook Pixel is a piece of JavaScript code you install on your website. When someone visits your site, this code activates and tracks the following actions:
- Page views
- Button clicks
- Adding items to the cart
- Purchases
- Form submissions, etc.
The data is automatically sent to your Facebook Ads Manager, where you can:
- See what happens after a user clicks an ad
- Analyze customer behavior
- Optimize ad campaigns for real business goals
Facebook Pixel bridges your ads and people’s behavior on your website.
What does Facebook Pixel offer to businesses?
1. Accurate tracking of conversions
You run ads, spend money, get clicks. But without Pixel, you don’t know:
- How many people actually made a purchase
- Which ads or campaigns brought those buyers
- Which products perform best
With Pixel, you see the exact situation. For example, ad campaign A generated 5 sales and campaign B generated none. Feel free to turn off ineffective ads and amplify the ones that work.
2. Smart advertising optimization
Pixel doesn’t just collect stats — it helps Facebook learn.
If you set a campaign goal like “Purchase”, the system will show ads to users who are more likely to buy, not just click.
The more events Pixel captures, the more accurate and powerful your ad delivery becomes.
3. Remarketing
One of the most powerful tools in digital marketing is bringing back users who already visited your website.
With Pixel, you can target:
- Users who viewed a product but didn’t add it to the cart
- Users who added an item to the cart but didn’t complete the purchase
- Users who started checkout but dropped off at payment
Imagine showing them exactly the product they were looking at. That’s a huge boost to conversion.
4. Lookalike Audiences
Pixel helps you find new people similar to your existing customers.
Example:
- You have 500 clients tracked by Pixel
- Facebook analyzes their behavior and finds similar users
- Then shows your ads to that lookalike group
One of the cheapest and most effective ways to scale your advertising.
How to install Facebook Pixel: Step-by-step instructions
Setting up Facebook Pixel is simple and doesn’t require coding skills. Most people can complete setup in 10–15 minutes.
Step 1: Creating a Pixel
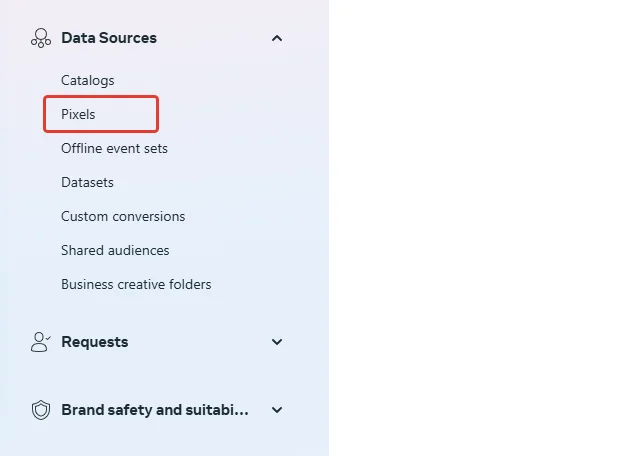
- Go to Meta Events Manager
- Click Connect Data Source → Select Web → Choose Facebook Pixel
- Name your Pixel and optionally enter your website URL (optional).
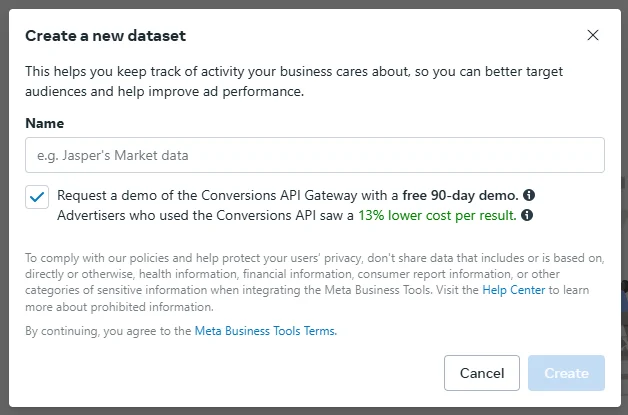
- Click Create
Step 2: Installing the code on your website
You have 3 options:
Option 1: Platform integration (Tilda, Shopify, WordPress, etc.)
- Select your platform in Events Manager
- Facebook will give you step-by-step instructions
- Paste your Pixel ID into the designated field on your site
This is the easiest and safest method, especially with website builders.
Option 2: Google Tag Manager (GTM)
If you’re using GTM:
- Log into your GTM account
- Create a new tag → Select Custom HTML
- Paste your Pixel code
- Set a trigger for all pages
- Publish changes
Option 3: Manual installation
- Copy the Pixel code
- Open your website’s HTML
- Paste the code inside the
<head>tag on all pages - Save and upload your site
Make sure the code isn’t duplicated or conflicting with other scripts
Step 3: Checking Pixel performance
- Install the Meta Pixel Helper extension (available in Chrome Web Store)
- Visit your website
- Click the extension icon to verify:
- Is Pixel active?
- What events is it tracking?
- Are there any errors?
If everything looks good, continue to event setup.
Step 4: Event Configuration
Facebook can track different on-site actions, called events.
List of standard events:
- PageView — page view
- ViewContent — viewed a product
- AddToCart — added to cart
- InitiateCheckout — started checkout
- Purchase — completed purchase
- Lead — signup or form submission
How can I configure it?
- Enter “Event Manager.”
- Select your Pixel → Click Customize → Customize Events
- Enter your site’s URL
- Facebook will load the site in visual mode
- Click any element (e.g. “Buy” button) and assign it an event
This setup requires no coding, even on non-CMS websites.
What to do if Pixel is not working?
- Make sure the code is inside the
<head>tag - Check for conflicts with other scripts
- Use Pixel Helper to debug
- Try GTM if manual install fails
- Contact a developer if needed
Useful tips when working with Pixel
- Install Pixel as early as possible, even if you don’t plan on advertising yet. It will start collecting data that will come in handy later.
- Separate the audiences: for example, those who have purchased the product and on the other side those who have only shown interest in it.
- Set up remarketing by specific actions: you can show ads to those who abandoned a shopping cart or read an article on the site.
- Use pixel data to create lookalike audiences and scale your ads.
Conclusion
Facebook Pixel isn’t just code, it’s a complete analytics and ad automation system that helps you do the following:
- It helps you figure out what works and what doesn’t.
- It helps to show ads to those who are interested in your product.
- It helps bring back potential customers.
- It helps to save budget and increase sales.
If you have a website, then Pixel should be installed for sure. It’s a simple add-on to your website with a huge impact.